Why No-Bake Cheesecake Pops Are Perfect Treats
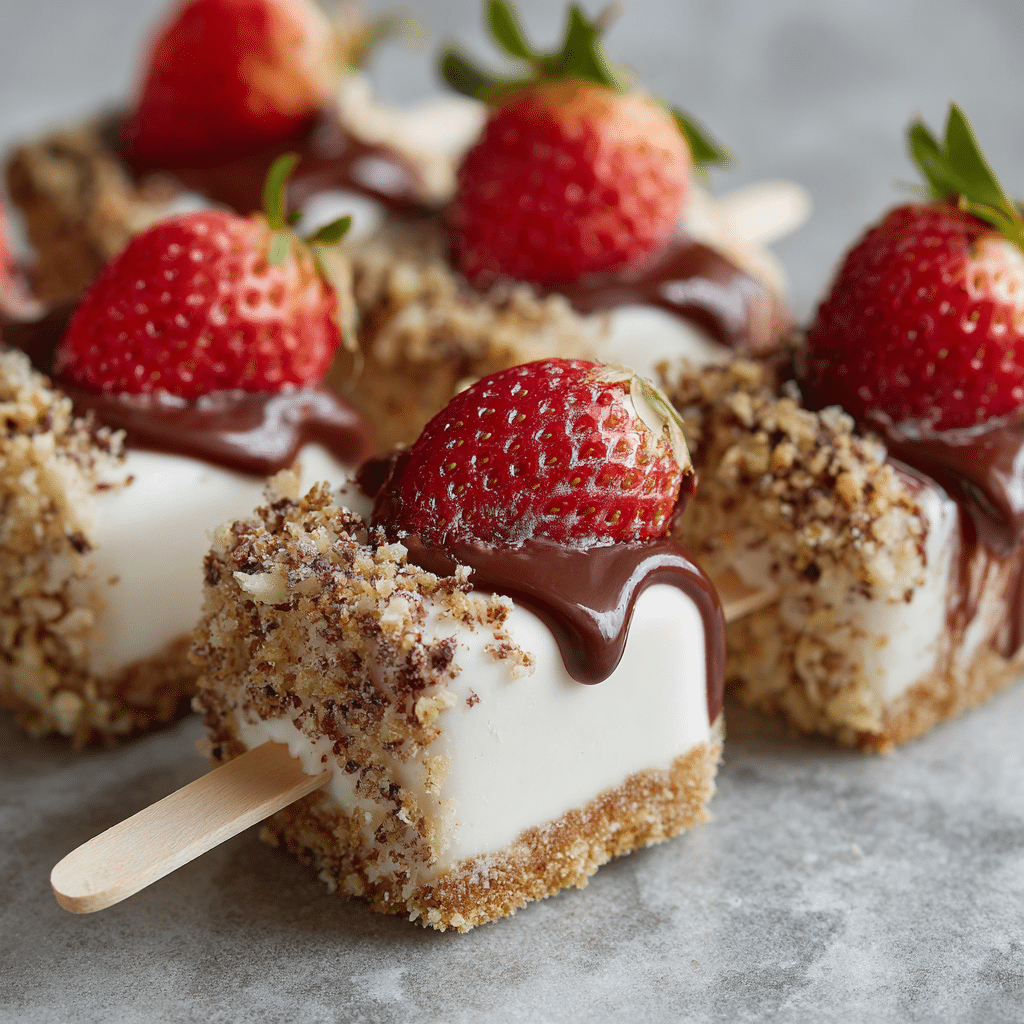
If you’re looking for a delightful dessert that’s quick, creamy, and fun to eat, No-Bake Cheesecake Pops are exactly what you need. These bite-sized treats bring together the smooth richness of cheesecake in a perfectly portable, fuss-free form that requires no oven time. Whether you’re hosting a party, craving a sweet snack, or exploring easy dessert ideas, No-Bake Cheesecake Pops deliver on flavor and convenience, making them a must-try for cheesecake lovers everywhere.
Why You’ll Love This Recipe
- Effortless preparation: No baking means you can have delicious cheesecake pops ready in under an hour without turning on the oven.
- Perfectly portioned: These pops are bite-sized, making them ideal for parties, kids, or anytime you want just a small indulgence.
- Versatile flavors: Easily customize with different toppings or mix-ins to suit your favorite tastes or dietary preferences.
- Creamy texture: The smooth and rich cheesecake filling is irresistible and melts in your mouth.
- Great for all seasons: Enjoy them chilled in the summer or as a comforting treat any time of year.
Ingredients You’ll Need
This recipe uses simple, classic ingredients that combine to create that signature creamy cheesecake flavor and texture. Each component plays a crucial role in delivering the perfect balance of sweetness, tang, and firmness for the pops.
- Cream cheese: Provides the rich and smooth base; make sure it’s softened for easy mixing.
- Sugar: Adds the right amount of sweetness without overpowering the tangy cream cheese.
- Vanilla extract: Enhances the flavor with warm, aromatic notes.
- Whipped cream or heavy cream: Creates a light and fluffy texture to balance the richness.
- Graham cracker crumbs: Essential for the crust, lending crunch and a classic cheesecake taste.
- Butter: Binds the crust together and adds a subtle buttery flavor.
- Chocolate or fruit toppings (optional): Perfect for adding color, flavor, and variety to the pops.
Variations for No-Bake Cheesecake Pops
The beauty of No-Bake Cheesecake Pops is how easily they adapt. Whether you want to experiment with flavors, accommodate dietary restrictions, or create themed treats, these variations will spark your creativity.
- Berry swirl: Mix in fresh or frozen berries for a refreshing twist on the classic flavor.
- Chocolate dipped: Coat the pops in melted chocolate and sprinkle with nuts or sea salt for an indulgent finish.
- Nut-free option: Substitute graham crackers with crushed gluten-free cookies for allergy-friendly pops.
- Vegan cheesecake pops: Use dairy-free cream cheese and coconut cream to create a creamy vegan version.
- Citrus zest: Add lemon or orange zest to the filling for a bright, tangy flavor burst.

How to Make No-Bake Cheesecake Pops
Step 1: Prepare the crust
Start by combining graham cracker crumbs and melted butter to form the crust base. Press this mixture evenly into the bottoms of a lined mini muffin pan or small silicone molds to create a firm foundation for your pops.
Step 2: Whip the cheesecake filling
In a mixing bowl, beat softened cream cheese with sugar and vanilla extract until smooth and creamy. Gently fold in whipped cream or heavy cream to lighten the texture, ensuring the filling is fluffy but still holds its shape.
Step 3: Assemble the pops
Carefully spoon or pipe the cheesecake filling on top of each crust portion, smoothing the surface with a small spatula. This creates the perfect bite-sized cheesecake pop form.
Step 4: Chill until set
Place the filled pan in the refrigerator and let the pops chill for at least 2 hours, or until firm enough to hold their shape when removed from the molds.
Step 5: Add toppings and serve
Once set, carefully remove the pops from the molds and decorate with your choice of chocolate drizzle, crushed nuts, fruit pieces, or sprinkles to add extra flair and flavor.
Pro Tips for Making No-Bake Cheesecake Pops
- Use full-fat cream cheese: It creates the best texture and richness essential for cheesecake.
- Softened cream cheese is key: Allow it to come to room temperature to avoid lumps in your filling.
- Don’t skip chilling time: Patience ensures the pops hold together perfectly when served.
- Use piping bags: For a neat and professional-looking assembly, pipe the filling rather than spooning.
- Try mini silicone molds: They make popping out the cheesecake bites easier without breaking them.
How to Serve No-Bake Cheesecake Pops
Garnishes
Elevate your No-Bake Cheesecake Pops with colorful and tasty garnishes like fresh berries, chopped nuts, chocolate shavings, or a dusting of cocoa powder. These add both aesthetic appeal and complementary flavors.
Side Dishes
Pair these pops with light fruit salads, refreshing iced teas, or sparkling lemonade for a delightful combo that balances the creamy richness with bright, fresh tastes.
Creative Ways to Present
Arrange the pops on a decorative platter surrounded by edible flowers or place each pop in decorative cupcake liners for easy grabbing at parties. You can also use a styrofoam block hidden in a decorated box as a pop stand for a fun display.
Make Ahead and Storage
Storing Leftovers
Keep No-Bake Cheesecake Pops refrigerated in an airtight container for up to 3-4 days to maintain freshness and creaminess. Make sure they’re covered well to avoid absorbing any fridge odors.
Freezing
If you want to store them longer, freeze the cheesecake pops in a single layer on a baking sheet and then transfer them to a freezer-safe container. They can last up to 2 months frozen and should be thawed in the fridge before serving.
Reheating
Since these pops are served chilled, simply let them thaw in the refrigerator if frozen, and enjoy cold. Avoid microwaving, as it will compromise their texture and melt the creamy filling.
FAQs
Can I make No-Bake Cheesecake Pops dairy-free?
Absolutely! Use dairy-free cream cheese alternatives and full-fat coconut cream or whipped coconut cream to replicate the creamy texture and taste without dairy.
Do I need a special pan for making the pops?
A mini muffin pan or silicone molds work best for shaping No-Bake Cheesecake Pops, but you can also use small individual serving cups and scoop with a spoon for a no-fuss approach.
How long do No-Bake Cheesecake Pops keep in the fridge?
They stay fresh for about 3-4 days in the refrigerator when stored properly in an airtight container.
Can I prepare these pops in advance for a party?
Yes! These cheesecake pops can be made a day or two ahead and stored in the fridge until you’re ready to serve, making them perfect for stress-free entertaining.
Are No-Bake Cheesecake Pops suitable for kids?
Definitely. Their small size and creamy texture make them kid-friendly treats, and you can adjust sweetness or flavors to suit younger palates.
Final Thoughts
Jumping into the world of No-Bake Cheesecake Pops opens up a deliciously easy way to enjoy a classic dessert reinvented in perfectly bite-sized form. With simple ingredients, minimal effort, and endless customization options, these treats are sure to become your new go-to recipe. Give them a try and watch how quickly they disappear!
Related Posts
- Why Fried Strawberry Cheesecake Sandwiches Delight
- Creamy Chocolate Avocado Mousse to Try Today
- How to Make a Traditional King Cake Recipe
No-Bake Cheesecake Pops

No-Bake Cheesecake Pops are creamy, bite-sized desserts that combine the rich flavor of classic cheesecake with a crunchy graham cracker crust. These easy-to-make treats require no baking, can be customized with various toppings, and are perfect for parties, snacks, or any occasion that calls for a fuss-free, delicious dessert.
- Prep Time: 20 minutes
- Cook Time: 0 minutes
- Total Time: 2 hours 20 minutes
- Yield: 24 pops 1x
- Category: Desserts
- Method: No-Bake
- Cuisine: American
- Diet: Gluten Free (when using gluten-free cookie substitute)
Ingredients
For the Crust
- 1 cup graham cracker crumbs
- 4 tablespoons unsalted butter, melted
For the Cheesecake Filling
- 16 ounces cream cheese, softened
- 1/2 cup granulated sugar
- 1 teaspoon vanilla extract
- 1 cup whipped cream or heavy cream, whipped
Optional Toppings
- Chocolate drizzle (melted chocolate)
- Crushed nuts
- Fresh fruit pieces
- Sprinkles
- Berry swirl (fresh or frozen berries mix-in)
- Fruit zest (lemon or orange zest)
Instructions
- Prepare the crust: Combine 1 cup of graham cracker crumbs with 4 tablespoons of melted butter until evenly mixed. Press the mixture firmly into the bottoms of a lined mini muffin pan or small silicone molds to form the crust base.
- Whip the cheesecake filling: In a mixing bowl, beat the softened cream cheese (16 ounces) with 1/2 cup sugar and 1 teaspoon vanilla extract until smooth and creamy. Gently fold in 1 cup of whipped cream or heavy cream to lighten the texture, ensuring the filling remains fluffy yet holds its shape.
- Assemble the pops: Spoon or pipe the cheesecake filling evenly on top of each crust portion, smoothing the surface with a spatula to create bite-sized cheesecake pops.
- Chill until set: Place the filled pan in the refrigerator and chill for at least 2 hours, or until the pops are firm enough to hold their shape when removed from the molds.
- Add toppings and serve: Carefully remove the cheesecake pops from the molds and decorate with your choice of chocolate drizzle, crushed nuts, fruit pieces, sprinkles, or other preferred toppings before serving.
Notes
- Use full-fat cream cheese for the best texture and richness.
- Allow cream cheese to soften to room temperature to avoid lumps in the filling.
- Do not skip the chilling time; it ensures the pops hold together well.
- For a professional look, pipe the filling instead of spooning it.
- Mini silicone molds help in removing the pops easily without breaking.
Nutrition
- Serving Size: 1 pop (about 25g)
- Calories: 110
- Sugar: 6g
- Sodium: 90mg
- Fat: 8g
- Saturated Fat: 5g
- Unsaturated Fat: 2g
- Trans Fat: 0g
- Carbohydrates: 7g
- Fiber: 0.3g
- Protein: 2g
- Cholesterol: 25mg
Keywords: no-bake, cheesecake, pops, bite-sized dessert, party dessert, creamy dessert, easy cheesecake, no oven dessert