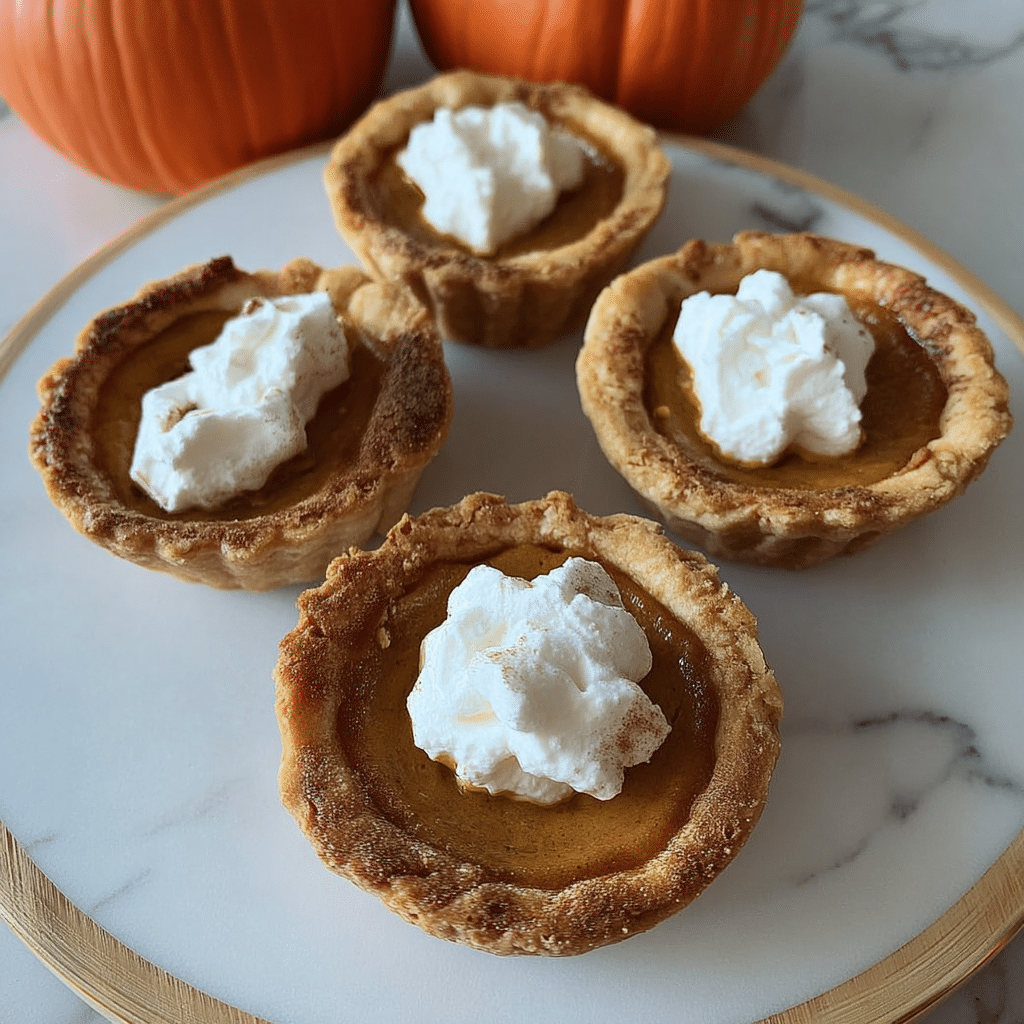
Pumpkin Pie Egg Tarts
If you’re craving a cozy, flavorful treat that combines the best of fall with the elegance of a delicate pastry, look no further than these easy Pumpkin Pie Egg Tarts. These delightful treats bring together the creamy, spiced pumpkin filling everyone loves and the buttery crispness of traditional egg tart crusts, making them an irresistible dessert or snack perfect for any time of year. Whether you’re new to baking or a seasoned pro, these Pumpkin Pie Egg Tarts will become a quick, tasty favorite you’ll want to make again and again.
Why You’ll Love This Recipe
- Simple yet impressive: This recipe is straightforward, but the finished tarts look like they came from a gourmet bakery.
- Perfect portion control: Individual tarts let you enjoy a sweet treat without overindulging.
- Seasonal flavors all year round: Bring the warmth of pumpkin pie spice into your kitchen anytime you want.
- Versatile dessert option: Serve them as a snack, dessert, or even at special gatherings like brunch or parties.
- Quick preparation time: You’ll have these tarts ready in under an hour, perfect for last-minute guests or a spontaneous craving.
Ingredients You’ll Need
This recipe calls for simple, everyday ingredients that work together to create the perfect balance of flavors and textures. Each component plays a vital role, from the richness of the pumpkin to the silky egg custard that makes these Pumpkin Pie Egg Tarts so addictive.
- Pie crust or tart shells: Use store-bought for convenience or homemade for extra buttery flavor.
- Pumpkin puree: The star ingredient, bringing natural sweetness and vibrant color.
- Eggs: Provide structure and that classic custardy texture.
- Sweetened condensed milk: Adds creamy sweetness without extra fuss.
- Brown sugar: Enhances the warm flavors and adds depth.
- Ground cinnamon, nutmeg, and ginger: Classic spices that make the pumpkin filling irresistible.
- Vanilla extract: A splash brightens and rounds out the flavor profile.
Variations for Pumpkin Pie Egg Tarts
Feel free to get creative and adapt this recipe to suit personal tastes or dietary needs. These Pumpkin Pie Egg Tarts are incredibly flexible and perfect for mixing things up while keeping that signature comforting pumpkin flavor.
- Dairy-free option: Substitute coconut milk or almond milk for sweetened condensed milk to keep it plant-based and creamy.
- Nut crust base: Swap traditional tart shells for a pecan or walnut crust for added crunch and flavor.
- Spiced up: Add a pinch of cloves or cardamom to elevate the spiced pumpkin filling.
- Maple syrup sweetener: Replace brown sugar with maple syrup for a natural, rich sweetness.
- Cheesecake twist: Swirl in some cream cheese into the filling before baking for a tangy surprise.

How to Make Pumpkin Pie Egg Tarts
Step 1: Prepare Your Tart Shells
Start by lining your muffin tin with pre-made tart shells or rolling out pie crust and cutting into rounds to fit. Press the dough gently into each cup to form a secure cup for your filling. Chill the shells briefly to prevent shrinking during baking.
Step 2: Mix the Pumpkin Filling
In a bowl, combine pumpkin puree, eggs, sweetened condensed milk, brown sugar, and all your spices along with vanilla extract. Whisk everything until smooth and creamy, ensuring the spices are evenly distributed for perfect flavor.
Step 3: Fill the Tart Shells
Carefully spoon the filling into each tart shell, filling almost to the brim but leaving a little room for the custard to rise and set without spilling over.
Step 4: Bake to Perfection
Place the tray in a preheated oven at 350°F (175°C). Bake for about 25-30 minutes until the filling is set but still slightly wobbly in the center and the crust edges are golden brown.
Step 5: Cool and Serve
Remove the tarts from the oven and let them cool completely in the pan. This helps the custard firm up and makes them easier to remove. Serve room temperature or chilled based on your preference.
Pro Tips for Making Pumpkin Pie Egg Tarts
- Room temperature ingredients: Using room temperature eggs and pumpkin puree helps the filling blend smoothly.
- Don’t overfill: Leave a little space at the top to avoid spills during baking.
- Chill the dough: Keep your tart shells chilled before baking to maintain their shape and crispiness.
- Test doneness carefully: A slight wobble in the center is perfect—avoid overbaking or the filling will dry out.
- Use fresh spices: Freshly ground cinnamon and nutmeg make a noticeable difference in flavor.
How to Serve Pumpkin Pie Egg Tarts
Garnishes
Top your tarts with a dollop of whipped cream, a sprinkle of cinnamon or nutmeg, or even a drizzle of caramel for an extra touch of indulgence.
Side Dishes
Pair Pumpkin Pie Egg Tarts with a hot cup of coffee or chai tea to complement their warm spices, or serve alongside fresh fruit for a light contrast.
Creative Ways to Present
Arrange tarts on a rustic wooden tray with fall leaves, or place each tart in a decorative cupcake liner for a festive look perfect for parties or seasonal gatherings.
Make Ahead and Storage
Storing Leftovers
Keep leftover Pumpkin Pie Egg Tarts refrigerated in an airtight container for up to three days to preserve freshness and flavor.
Freezing
These tarts freeze beautifully; wrap each tart individually in plastic wrap and place in a freezer-safe container. Thaw overnight in the refrigerator before enjoying.
Reheating
Warm leftover tarts gently in a low oven at 300°F (150°C) for 10-15 minutes or enjoy them cold straight from the fridge for a custardy treat.
FAQs
Can I use canned pumpkin or fresh pumpkin for these tarts?
Canned pumpkin puree is ideal for its smooth texture and consistent flavor, but homemade pumpkin puree works perfectly if prepared well and smoothly strained.
Is it possible to make these tarts gluten-free?
Absolutely! Simply substitute the tart shells with gluten-free pastry or make your own gluten-free crust using almond flour or your preferred gluten-free mix.
How long do Pumpkin Pie Egg Tarts last?
Stored properly in the refrigerator, they stay fresh for up to three days; freezing can extend their life to about a month.
Can I prepare the filling in advance?
Yes, you can mix the filling a day ahead and refrigerate it. Just give it a good whisk before filling the tart shells to recombine any settled spices or ingredients.
What can I serve these tarts with for a party?
These Pumpkin Pie Egg Tarts pair wonderfully with hot cider, coffee, or a light dessert wine, making them excellent for sharing at festive gatherings.
Final Thoughts
These easy Pumpkin Pie Egg Tarts are pure joy in every bite and a fantastic way to celebrate cozy flavors without fuss. Once you try this recipe, you’ll understand why it’s become one of the most loved pumpkin-inspired treats. So go ahead, gather your ingredients, and start baking a batch today—you won’t regret it!
Related Posts
PrintPumpkin Pie Egg Tarts

These easy Pumpkin Pie Egg Tarts combine creamy, spiced pumpkin filling with a buttery, crisp tart shell to create an irresistible dessert or snack perfect for any season. Featuring seasonal fall flavors packed into individual-sized pastries, this straightforward recipe yields bakery-quality tarts in under an hour, ideal for both beginners and experienced bakers.
- Prep Time: 15 minutes
- Cook Time: 25-30 minutes
- Total Time: 40-45 minutes
- Yield: 8 individual tarts 1x
- Category: Appetizers
- Method: Baking
- Cuisine: American
- Diet: Gluten Free (if gluten-free crust used)
Ingredients
Crust
- 8 pre-made pie crust rounds or tart shells (store-bought or homemade)
Filling
- 1 cup pumpkin puree (canned or homemade)
- 2 large eggs
- 3/4 cup sweetened condensed milk (or coconut/almond milk for dairy-free)
- 1/3 cup brown sugar
- 1 teaspoon ground cinnamon
- 1/2 teaspoon ground nutmeg
- 1/4 teaspoon ground ginger
- 1 teaspoon vanilla extract
Instructions
- Prepare Your Tart Shells: Start by lining your muffin tin with pre-made tart shells or rolling out pie crust and cutting into rounds to fit. Press the dough gently into each cup to form a secure cup for your filling. Chill the shells briefly to prevent shrinking during baking.
- Mix the Pumpkin Filling: In a bowl, combine pumpkin puree, eggs, sweetened condensed milk, brown sugar, ground cinnamon, nutmeg, ginger, and vanilla extract. Whisk everything until smooth and creamy, ensuring the spices are evenly distributed for perfect flavor.
- Fill the Tart Shells: Carefully spoon the filling into each tart shell, filling almost to the brim but leaving a little room for the custard to rise and set without spilling over.
- Bake to Perfection: Place the tray in a preheated oven at 350°F (175°C). Bake for about 25-30 minutes until the filling is set but still slightly wobbly in the center and the crust edges are golden brown.
- Cool and Serve: Remove the tarts from the oven and let them cool completely in the pan. This helps the custard firm up and makes them easier to remove. Serve at room temperature or chilled based on your preference.
Notes
- Use room temperature eggs and pumpkin puree to help the filling blend smoothly.
- Don’t overfill the tart shells; leave a little space at the top to avoid spills during baking.
- Keep tart shells chilled before baking to maintain their shape and crispiness.
- A slight wobble in the center when baked means perfect doneness; avoid overbaking to keep filling moist.
- Use freshly ground cinnamon and nutmeg for the best flavor.
Nutrition
- Serving Size: 1 tart
- Calories: 220
- Sugar: 18g
- Sodium: 120mg
- Fat: 9g
- Saturated Fat: 5g
- Unsaturated Fat: 3g
- Trans Fat: 0g
- Carbohydrates: 30g
- Fiber: 2g
- Protein: 4g
- Cholesterol: 70mg
Keywords: pumpkin, egg tarts, pumpkin pie, fall dessert, autumn dessert, spiced pumpkin, custard tart, gluten-free dessert, easy baking, seasonal dessert